Friday, April 16, 2010

Pixie Play

I have been working on a commission piece the last few months.  The client wanted a piece similar to "Pixie Capers" . 

We talked about the elements she wanted in the piece, which were:  3 pixies wearing acorn cap hats and a tree.  "Pixie Capers" has a knothole in the tree. I need to make a similar piece but not a copy, so I decided to make a hollow in this tree, for a hiding place.

The tree form is created from cardboard and wire, covered in felt.  Here are the three pixie bodies with the tree.

 I thought of making a silk fusion tree.  Silk fusion works very well for bark, as in "Every Acorn Has to Fall".  But I know she wants a piece very similar to "Pixie Capers", so I went with the needlefelted bark.  Here I am beginning to needlefelt.  I start with a layer of chiffon, cover it with felt, then add bits of hand dyed scrim and dryer sheets.  This process takes several days.......

Adding more layers.......

Adding even more layers.....

Needlefelting from the back "pushes" the chiffon through to the other side, creating an even more textured surface.

I cut the pieces apart, needlefelt them even more to blend, and burn the edges.  It's important to do the burning in a well ventilated place.

Now it's time to sew the bark onto the tree form.


This is starting to look like a tree now.

Below are some of the fabrics used on the background of the piece and the pixies'  clothing.  I mixed up a nice mossy green and dyed these three different fibers in the same dye bath.  Now they are drying outside in the sunshine.
It's always fun to see how the different fibers take the dye. 

Cotton yarn on the left, silk habotai in the middle, nylon on the right.  Isn't it interesting how the cotton is so much greener, and the nylon has more brown in it!

Now it's time to work on the acorn caps.  I had a little trouble finding what I needed.  The first ones used in "Pixie Capers" were a gift.  They were found locally, but not this time.  I tried several local sources with no luck.  Then I found a place to order some online, which were supposed to be really big but when I received them I was disappointed in their size.  I ordered from another source, and this time they were big enough to work.

I need to cut them and remove the acorn inside.  I use a dremel tool for this part.
Here is the acorn cap that I just cut.  Now I need to scrape the inside so that it will fit my pixie's head......

And here is the cap scraped and ready to become a hat.


Tiny fingers need tiny fingernails.......

The tree is sewn to the embellished background fabric, so that it will be secure.
 
I use a circular needle.  This helps me maneuver around the curve of the tree.

At last, the piece comes together!  My task was to create a piece similar to "Pixie Capers" without being a copy.  The hollow in the tree is a perfect hiding place for a pixie.  If there is a hiding pixie, then they must be playing hide-and-go-seek.  To convey the idea of hide-and-go-seek in a small space I came up with the idea of "blind man's bluff".  The pixies all wear scarves sewn with silk habotai leaves.  The one who is "it" wears his as a blindfold.   Here is the finished piece.
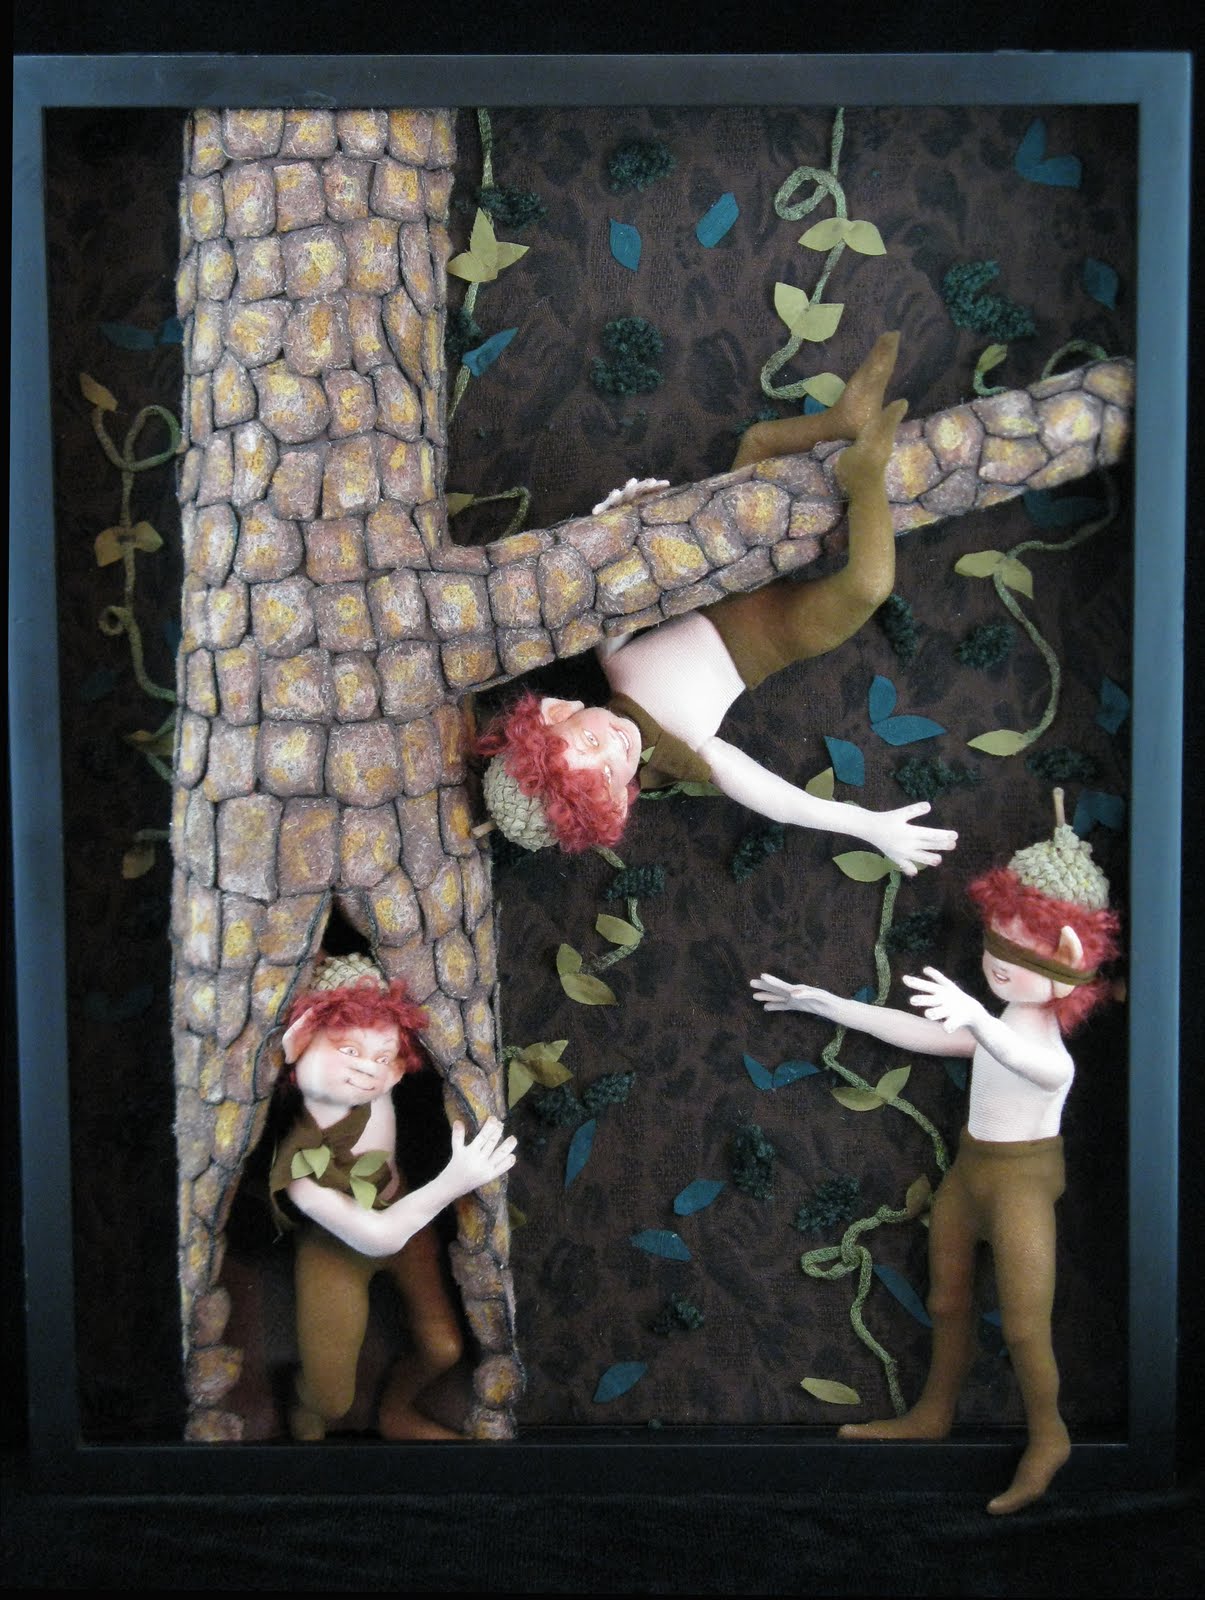
I noticed that the colors aren't true in this photo.  They seem washed out and over exposed so I took the piece outside to see if I could get truer colors with daylight.

The colors look a little better now. 
Below are some detail shots.

Pixie hanging from the tree.

Hiding Pixie


Blindfolded Pixie

Monday, April 12, 2010

Texas City Art Festival

Saturday night was the opening reception for the Texas City Art Festival.  I entered three pieces and one received an honorable mention.
This is "Forest Canticle" which had also won an award in Galveston earlier this year.  I'm so glad because she's one of my favorites. :)

Here we are, the 3D category winners.  Wouldn't you know I would drop my award at the critical picture taking moment!  LOL!
That's my friend and fellow TAODA artist Donna Sims to my left, who won third place.  Yay Donna!
My darling daughter Rosie took these pictures.  She gave up the chance to go to a Dynamo's soccer game to come with me to the reception.  Isn't she sweet? :)

Monday, April 5, 2010

Happy Easter!


Happy Easter from our house to yours......


Yes, the Easter Bunny still visits our house!


Saturday, March 27, 2010

Spring!

Last week was Spring Break!  My girls and I went to Galveston for a few days - we picked the best ones!  You never know what you are going to get with the weather mid March.  We had gorgeous weather for the beach. :) 

Christina and Sabrina

   Christina in the kitchen

Christina's back at UT now.  But she'll be home again for Easter - I hope!

Rosie and I went to the Bayou City Art Festival yesterday.  Also perfect weather! 
There were some interesting performers......

Tree Man


Stilt Walker and Dancer

There was a figurative artist named Joan Rasmussen from Atlanta who allowed me to take a photo of her booth.
This photo doesn't do justice to her work - it's wonderful!  See it here:

We also found a wonderful fiber artist from New Orleans named Kate Beck.  She has the most beautiful shawls and scarves!  I had to have one of her scarves......

Here I am wearing my beautiful new hand dyed scarf with flowers

Rosie bought one of her flower hair clips and here it is in her gorgeous curls:

Kate Beck also sells her work through Dutch Alley Artist's Co-op in the French Quarter, New Orleans.


Tuesday, March 16, 2010

Challenge Piece


Last Saturday we had the unveiling of the challenge pieces at our TAODA meeting.  Here's mine:


The challenge was to create a hanging work, based on or inspired by music.  The original inspiration for my piece was "Helplessly Hoping" by Crosby Stills Nash.  You'd never guess it by looking at it!  It sort of took on a life of its own and went in its own direction.  The only thing resembling the song is the harlequin costume.  The figure was going to be a man but when I added hair he became a little boy.  So my initial title of "Hoping" was not going to work.  A couple of artists at the meeting suggested "First Love" and I like that so I've decided to combine the two titles and call it "Hoping: First Love".


The large tree in the foreground, and the trees in the background are made from the gray silk I dyed last week.  The face on the tree and the heart faces are paperclay.  The boy is cloth with needlesculpted features.


The background was created in a process called confetti landscape quilting.


"Hoping: First Love"

Thursday, March 4, 2010

Dyeing Silk


I dyed silk yesterday for a new project I'm working on.  We are doing a "challenge" in TAODA of dolls based on a piece of music.  I won't say what mine is until it's completed, but it involves a tree.  I've been doing trees lately.  I'm actually working on another piece with a tree - a commission - similar to "Pixie Capers", which also has a tree in it.  More on that later....


Anyway, the tree for the challenge piece will have bark made of silk tussah.  I wanted gray tones for the bark.  And I also wanted to dye some silk gauze and habotai at the same time.

Silk gauze is on the upper left, habotai on the right, and tussah roving is in the center at the bottom. 

I wanted the silk gauze to be darker, so I put it in the dye bath first.


Then I poured the dye into a plastic tub and added the habotai.

After removing the habotai I added the tussah roving.  I poured more dye over some areas so that there would be lighter and darker shades of gray within the roving.


It was a sunny day so I took everything outside to dry.  There is my dog Sabrina in the background.

Here is Sabrina in "her" chair, keeping an eye on things.  You can see from the picture of the drying silk that practically everything in my yard is dead.  Everything except the pansies.  Thank goodness for pansies. :)


And now, the lovely gray silk:

Next step, silk fusion.